The community is working on translating this tutorial into Georgian, but it seems that no one has started the translation process for this article yet. If you can help us, then please click "More info".
Creating a View
If you have read the previous articles, you should now have a very basic ASP.NET MVC project, capable of outputting a simple "Hello world" message. This text is generated directly in the controller and returned as plain text to the browser, but obviously that won't be practical for anything other than the most rudimentary tasks. What we want is of course dynamic pages, created with HTML and other web technologies. For that, we need Views, which are the visual representation of the Model returned by the Controller.
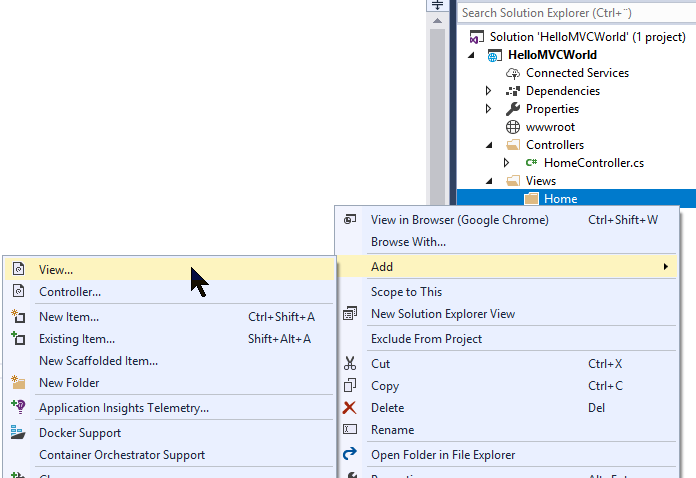
Since we have already created a Controller (called HomeController), we're now at the point where we should create a View for it, instead of just returning a piece of text. And as we saw in the previous article, Controllers usually live in a folder called "Controllers", so we should have a folder called "Views" as well. Just right click the project in the Solution Explorer and select Add -> New Folder, just like we did in the previous article. It's also customary to have one folder per Controller, so inside the new Views folder, let's create a folder called Home, to contain the view(s) we have for our HomeController. With that in place, we are now ready to create a View inside our new folder:

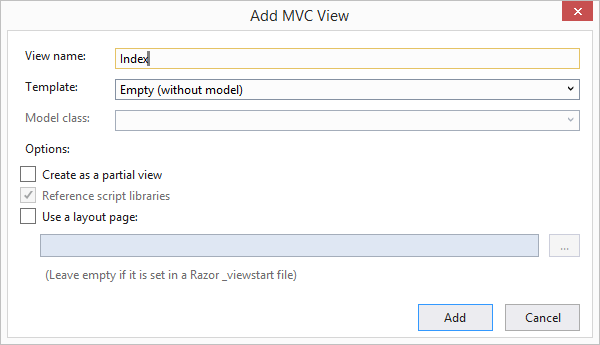
You will see a dialog with quite a bit of options. They are all very relevant and we will discuss most of them later in this tutorial, but for now, let's just add a simple View to our project. You can do that by replicating the options I have used from this screenshot:

Click Add and we finally get our brand new View. The code in it will look something like this:
@{
    Layout = null;
}

<!DOCTYPE html>

<html>
<head>
    <meta name="viewport" content="width=device-width" />
    <title>Index</title>
</head>
<body>

</body>
</html>
That's basically just some standard HTML for a blank document, with only a little bit MVC-related code in the top, based on the Razor syntax, which we'll get to in one of the upcoming chapters. For now, just ignore it and work with the HTML, which you hopefully already know and understand.
At this point, let's make a small modification to the HTML, to display a greeting to the world - it should of course go between the tags, like this:
<body>

    <span style="font-size: 18pt;">Hello, <b>MVC</b> world!</span>

</body>
We just need to do one thing more: In the previous article, we changed the Index() method to return a simple piece of text instead of a View. Now that we want to use a View, we need to change that back, so open the HomeController and modify the Index() method like this:
public IActionResult Index()
{
    return View();
}
Now everything should be in place, so just press F5 to run the project and hopefully you will see our new, lovely view in the browser, instead of the boring piece of plain text we saw in the last article.
How does it work?
Thanks to the default routing mechanisms found in the ASP.NET MVC framework, the root URL is automatically routed to the HomeController's Index() method (don't worry about routes just yet, we will talk about them soon). With a call to the View() method, a number of locations are searched to find a View with a matching name, in this case \[project root]\Views\[name of controller]\Index.cshtml. This view is then interpreted (as it may very well contain Razor code) and then returned as output to the browser.
Summary
We have now successfully combined a Controller and a View to generate an actual web page. It might still seem like voodoo or black magic, but just move on in this tutorial and get a feeling of how it works and how powerful the framework is, before trying to fully grasp all the concepts.
There's a lot more you need to know about Views though, to take full advantage of ASP.NET MVC - this was just an introduction, to get you up and running. In an upcoming chapter, we'll dig much deeper into the subject of Views.