The community is working on translating this tutorial into Georgian, but it seems that no one has started the translation process for this article yet. If you can help us, then please click "More info".
Getting started
In the previous articles, we decided on a database engine (MS SQL Server, and for testing/development: The SQL Server Express LocalDB) and a database framework/ORM (Dapper). In this article, I'll help you get started with both of them, so that you can proceed and learn more on how to make your ASP.NET MVC projects work together with a database.
During these next articles, we'll build a complete (but simple) database-driven TODO list. Besides the database engine and framework, which we'll be discussing now, you'll need a new ASP.NET MVC Core project for this. The process of creating a new project has been described earlier in this tutorial, so if you're unsure of how to do it, just go back and read all about it.
Setting up SQL Server Express (LocalDB)
As mentioned in one of the previous articles, Microsoft SQL Server comes with an easy-to-setup development version called SQL Server Express (LocalDB). The last part of the name is very telling: Instead of running a full blown SQL Server with all its services on your development machine, which could be reached (in theory) from any other machine on the Internet, the LocalDB alternative is a completely trimmed version of SQL Server which can only be reached locally on your computer. Also, instead of being available 24/7 as a constantly running service, the LocalDB is started when you need it.
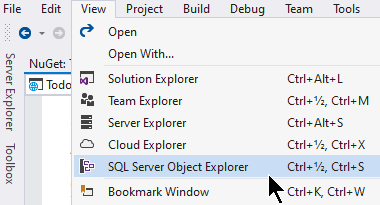
The LocalDB is installed together with Visual Studio (unless you have actively asked the installer not to) and you can even control it from inside Visual Studio. If you don't already see the Tool window for doing this, just go to the View menu and click SQL Server Object Explorer:
The SQL Server Object Explorer Tool window will now appear and look something like this:
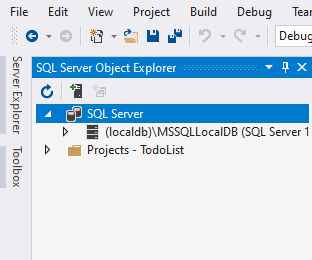
Try unfolding the (localdb) node, so that you can see databases etc. If you haven't used your LocalDB before (and I assume you haven't, since you're reading this tutorial) the Databases node will be empty. We need to do something about that, by creating a new database for our upcoming TodoList project:
Creating a new database
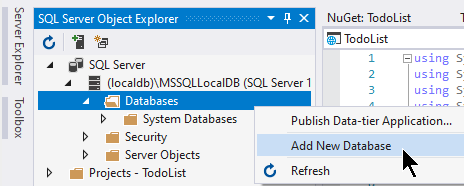
In the dialog that pops up, just give your database an appropriate name - I called mine TodoList, just like the Visual Studio project I created for this purpose.
Adding a table
An SQL Server database can contain multiple tables, which are the ones holding the actual data. A table is much like a class in your code - they contain information about a specific entity. For our project, we need a table which will hold all the items found on our TODO list. A suitable name for this table would therefore be TodoListItems.
Adding a table is just as easy as adding a database:
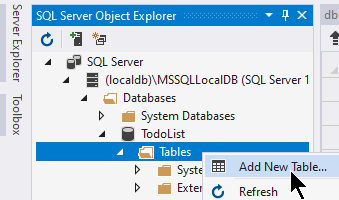
You will be presented with the Table Designer window, where you can add the rows you need for this table. Here's how my TodoListItems table look:
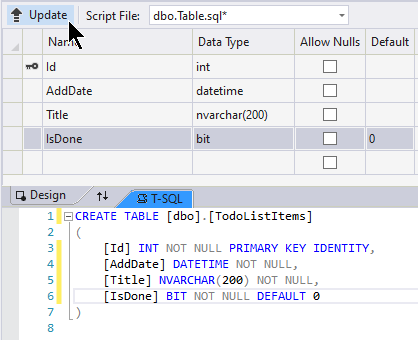
You can either re-create the rows I have, or if you want to save time: Simply copy the below SQL into the T-SQL part of the designer:
CREATE TABLE [dbo].[TodoListItems]
(
    [Id] INT NOT NULL PRIMARY KEY IDENTITY,
    [AddDate] DATETIME NOT NULL,
    [Title] NVARCHAR(200) NOT NULL,
    [IsDone] BIT NOT NULL DEFAULT 0
)
When done, simply click the Update button (you can see it in the top of the screenshot above). This will make Visual Studio apply the SQL to your database and thereby create the new table - you will see it appear immediately in the SQL Server Object Explorer. Congratulations, you now have a database with a table with rows - in other words, the data backend is ready to use!
Adding Dapper
With the database in place, we now just need the database framework, as discussed in the previous articles. Thanks to the NuGet package system, installing 3rd party libraries in your projects is very easy. You can do it from the UI, or by using the NuGet Console: From the Tools menu, select NuGet Package Manager -> Package Manager Console. The Console will open in a Tool window like this:
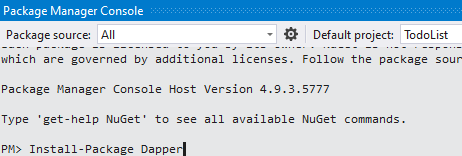
Now type the following command and press Enter:
Install-Package DapperThis will make the NuGet manager install the latest version of the Dapper library into your project!
When talking about persistent storage, which is for example a database like SQL Server, the concept of CRUD is often mentioned. It stands for Create, Read, Update, Delete - these are operations that you will be doing all the time when working with a database. However, Dapper only include methods for doing the reading. This is because they want to keep the library as lean and fast as possible: It will perform all the mapping for you, and you can get the data out of the database, but if you want to do one of the other operations, you will have to manually write the SQL for it.
But don't worry! There are many 3rd party Dapper extensions out there, which can extend the functionality of Dapper to do these operations as well as many other useful tasks. Dapper.Contrib is a great example of this - it simply adds the CRUD operations like Insert(), Update() and Delete() that we need. It can be installed just as easily as Dapper itself and just like Dapper, it simply extends the classes you will be using anyway. Run the following command in the Package Manager Console:
Install-Package Dapper.ContribWith that in place, we're finally ready to proceed.
Summary
We now have a database, including a table to contain our TODO-list items, and we have our database framework (Dapper) installed. In the next article, we'll continue the effort of creating our ASP.NET MVC database-driven TODO list.