The community is working on translating this tutorial into Lao, but it seems that no one has started the translation process for this article yet. If you can help us, then please click "More info".
Layout Files
As discussed in the introduction to this chapter, a Layout file allows you to re-use common markup across multiple web pages in your project. This is done by specifying all the common stuff in a layout file and then referencing this file in all of your sub pages (unless you don't want them to use the common layout, of course).
In ASP.NET MVC, layout files looks just like a regular view and they also use the same extension (.cshtml). It could look like this:
_Layout.cshtml
<!DOCTYPE html>
<html>
<head>
    <title>Layout</title>
</head>
<body>

    @RenderBody()

</body>
</html>
Notice how it's almost just a regular HTML file, except for the RenderBody() Razor method. This part is required in a Layout file, because it specifies where the content of the page using the Layout should be placed. A file using the Layout could look like this:
LayoutTest.cshtml
@{
    Layout = "~/Views/Shared/_Layout.cshtml";
}

<p>Hello, world!</p>
Again, the magic happens in the Razor part, where we specify the Layout to be used. ASP.NET MVC will now combine these two files each time the LayoutTest view is used, resulting in something like this when the page is returned to the browser:
Result
<!DOCTYPE html>
<html>
<head>
    <title>Layout</title>
</head>
<body>

<p>Hello, world!</p>

</body>
</html>
Adding a Layout to your MVC project
We already discussed, in a previous article, how you can add Views to your project. Fortunately, it's just as easy to add a Layout view to your project, as I will now demonstrate, but there are a couple of guidelines that I would like for you to know about first:
- Layouts are usually placed in a sub-folder of the Views folder called Shared. This is one of the places ASP.NET will automatically search if you don't specify a full path to your Layout file.
- The filename of Layout views are usually prefixed with an underscore, to indicate that this is not a regular View. If you only plan on using one Layout, it could be called simply _Layout.cshtml - otherwise, use a name to indicate what the Layout will be used for, e.g. _AuthenticatedUserLayout.cshtml.
With that in mind, let's add a Layout to our project (I'm assuming that you already have a Views folder with a Shared folder inside - if not, you may add it, as described previously in this tutorial):

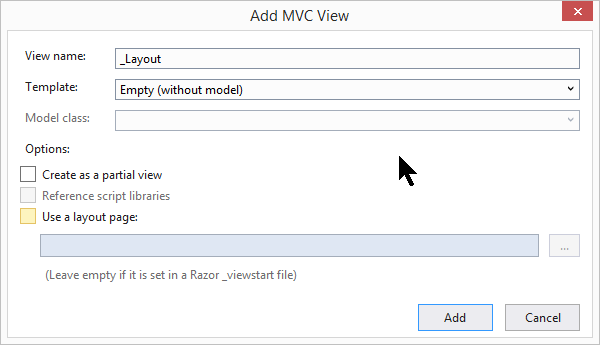
In the dialog, you basically just have to fill out the name and make sure that partial/layout options are not checked:

A file called _Layout.cshtml will now be created, consisting of basic HTML and an empty layout statement in the top. All you need to do is add your own markup and then remember to add a call to the RenderBody() method in the place where you want the page content to be inserted, like this:
@{
    Layout = null;
}

<!DOCTYPE html>

<html>
<head>
    <meta name="viewport" content="width=device-width" />
    <title>_Layout</title>
</head>
<body>
</body>
</html>
With that in place, you are now able to reference your Layout from one of your pages, like we showed previously in this article:
@{
    Layout = "~/Views/Shared/_Layout.cshtml";
}

<p>Hello, world!</p>
Summary
Layouts allow you to specify common markup in just one place and re-use it across multiple pages. ASP.NET MVC supports multiple layouts, if you need it, and you can of course decide if all or just some of your pages should be using a specific Layout. There are still a few Layout-related tricks that I haven't shown you yet, as you'll see in the next articles, so please read on.