The community is working on translating this tutorial into Thai, but it seems that no one has started the translation process for this article yet. If you can help us, then please click "More info".
TODO List: The View
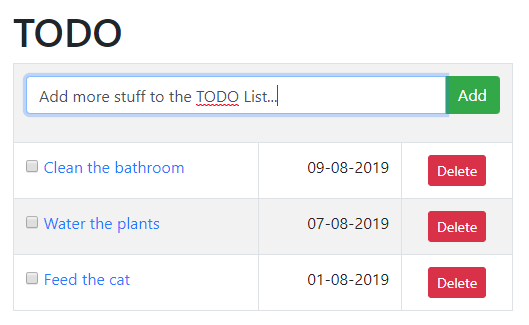
In the previous articles, we setup a database for our TODO List web application. We also added a Model, a ViewModel and a Helper class. Now it's time to add the View that will create the visual representation of our TODO List, but first, here's a screenshot to show you how it will eventually look:

Since our web app only has one View, there's no need for a reusable Layout. Instead, we just have all the required HTML in our Index.cshtml view. The markup is quite simple but there are especially two important parts you should pay attention to: The FORM, which is used to add/edit items, and then the loop which generates the rows for the TODO list items. Let's go through them with a brief explanation of each:
The FORM
Here's the markup/Razor code used to generate our FORM:
@using(var form = Html.BeginForm("CreateUpdate", "Home", FormMethod.Post))
{
    @Html.HiddenFor(model => model.EditableItem.Id)
    <div class="input-group">
    @Html.TextBoxFor(model => model.EditableItem.Title, new { @class = "form-control" })
    <div class="input-group-append">
        <button type="submit" class="btn btn-success">@(Model.EditableItem.Id > 0 ? "Update" : "Add")</button>
    </div>
    </div>
    @Html.ValidationSummary()
}
This block uses several Razor techniques already discussed in this tutorial. We use the Html.BeginForm() helper method to generate a FORM tag which will post back to the Home Controller and hit the CreateUpdate() action. It has been named like this because the FORM will be used for both adding and editing items.
Inside the form, we generate a hidden field for the Id of the EditableItem from the ViewModel. We also generate a visible text field for the Title property and then we have a button to submit the form, which will have the text "Add" or "Update" depending on whether we're editing an existing item or not (we can see this based on the Id property - new items will have an Id of 0).
In the bottom we will display potential validation errors generated by the CreateUpdate() method with the call to Html.ValidationSummary() method.
The TODO list
Here's the markup/Razor code used to generate the visual representation of the TODO list:
@foreach(var item in Model.TodoItems)
{
    <tr>
    <td>
        <input type="checkbox" checked="@item.IsDone" onclick="window.location.href = '/Home/ToggleIsDone/@item.Id';" />
        <a href="/Home/Edit/@item.Id">
        @item.Title
        </a>
    </td>
    <td class="text-right">
        @item.AddDate.ToShortDateString()
    </td>
    <td class="text-center">
        <a href="/Home/Delete/@item.Id" onclick="return confirm('Are you sure?');" class="btn btn-sm btn-danger">Delete</a>
    </td>
    </tr>
}
Using a foreach loop, we iterate over the TodoItems property found in our ViewModel. For each item, we generate a table row (TR) with three columns. The first column contains a checkbox, which will be checked if the TODO list is "done" - notice the small JavaScript snippet I have in the onclick event handler, which will call the ToggleIsDone() action on the Controller to update the IsDone column in the database. We also have the Title of the TodoListItem, embedded inside a link which will call the Edit() method on the Controller. Both actions will be described in the Controller article.
In the second column, we simply output the AddDate of the TodoListItem. In the third column, we create a Delete-button, again calling an action (Delete()) on the Controller.
The complete View
Now that you know how the two important parts of the View works, it's time to get the full picture:
@model TodoList.ViewModels.TodoListViewModel
<!DOCTYPE html>

<html>
<head>
    <title>TODO List</title>
    <link rel="stylesheet" href="https://stackpath.bootstrapcdn.com/bootstrap/4.3.1/css/bootstrap.min.css" integrity="sha384-ggOyR0iXCbMQv3Xipma34MD+dH/1fQ784/j6cY/iJTQUOhcWr7x9JvoRxT2MZw1T" crossorigin="anonymous">
</head>
<body style="margin: 20px;">

    <h1>TODO</h1>
    <table class="table table-striped table-bordered table-hover" style="max-width: 500px;">
    <tr>
        <td colspan="3">
        @using(var form = Html.BeginForm("CreateUpdate", "Home", FormMethod.Post))
        {
            @Html.HiddenFor(model => model.EditableItem.Id)
            <div class="input-group">
            @Html.TextBoxFor(model => model.EditableItem.Title, new { @class = "form-control" })
            <div class="input-group-append">
                <button type="submit" class="btn btn-success">@(Model.EditableItem.Id > 0 ? "Update" : "Add")</button>
            </div>
            </div>
            @Html.ValidationSummary()
        }
        </td>
    </tr>
    @foreach(var item in Model.TodoItems)
    {
        <tr>
        <td>
            <input type="checkbox" checked="@item.IsDone" onclick="window.location.href = '/Home/ToggleIsDone/@item.Id';" />
            <a href="/Home/Edit/@item.Id">
            @item.Title
            </a>
        </td>
        <td class="text-right">
            @item.AddDate.ToShortDateString()
        </td>
        <td class="text-center">
            <a href="/Home/Delete/@item.Id" onclick="return confirm('Are you sure?');" class="btn btn-sm btn-danger">Delete</a>
        </td>
        </tr>
    }
    </table>
</body>
</html>
You'll notice that I have included a reference to the Bootstrap CSS file. While this might be a bit of an overkill for such a simple web app, it allows me to style the example very nicely without adding a lot of CSS code. Besides the link to the CSS file, you will only see references to CSS classes from the library, like "text-center" and the table classes.
Summary
With the View in place, we now just need to work on our Constructor, which will glue the ViewModel/Model together with the View. Move on to the next article to read all about it.