TOC

The community is working on translating this tutorial into Chinese, but it seems that no one has started the translation process for this article yet. If you can help us, then please click "More info".

Getting Started:

Hello, MVC World!

安装并启动Visual Studio后,我们就可以创建我们第一个ASP.NET MVC应用了,我们就叫它“HelloMVCWorld”。像其他编程教学一样,我们稍作改动,也创建一个经典的"Hello, world"程序作为开始。

In Visual Studio, from the File menu, select New -> Project. You will be presented to the New Project dialog, where you select the project type, name and location. For this tutorial, we'll use an ASP.NET Core Web Application - you can either look for it in the list or use the Search box, as I have on the screenshot:

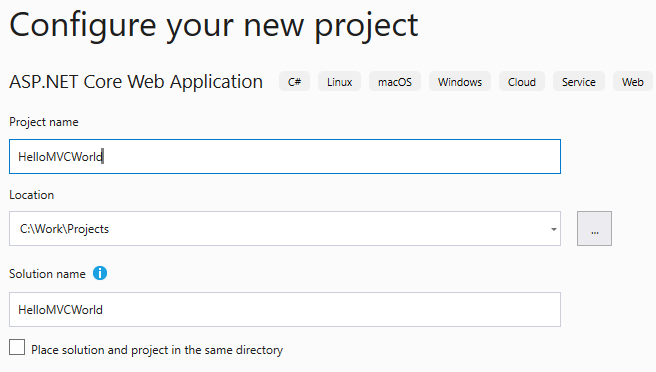
After clicking Next, you will be presented with a dialog where you can specify the details for your project. You will need to specify a name and a location for it, e.g. like this:

With all the details in place, you can now click the Create button to proceed to the final step. Here you will be asked to select the Template which should be used when creating the project:

You might be tempted to select the template called "Web Application (Model-View-Controller)", because after all, MVC is what this tutorial is about, right? Yes it is, but in this tutorial, you learn everything from scratch and the MVC template includes a LOT of stuff by default - it's actually a complete, but small, website when created. That might be too confusing, so instead, select the Empty template - it only contains the bare minimum of files that you need to create an MVC web application.

Proceed by clicking the Create button once again.

Visual Studio will now create a new project for you, containing only a couple of files. Believe it or not, this is actually all we need to create the classic "Hello, world!" greeting - try pressing F5 and see for your self. This will make Visual Studio compile your new project and open the resulting website in your default browser, which should simply display the message "Hello World!". But how did this happen?

By default, VS creates a Startup.cs file - it does basic setup stuff, which we'll discuss later on in this tutorial, but for now, look for this line of code:

await context.Response.WriteAsync("Hello World!");

We're now going to change this message to be MVC related, as promised. If your project is still running, your project files will be in read-only mode, so you need to stop the website, either by closing the browser window opened by VS or by selecting Debug -> Stop Debugging (or pressing Shift+F5). Now you can edit the Startup.cs file, so simply change the message so that the line of code looks like this:

await context.Response.WriteAsync("Hello, MVC World!");

Run your project again (from the Debug menu or by pressing F5), and there you go - the message has been changed!

Summary

Congratulations, you have just created a very simply web application, but so far, we haven't seen any models, views or controllers. We will change that in the next article, where we start the MVC learning process by having a look at controllers.


This article has been fully translated into the following languages: Is your preferred language not on the list? Click here to help us translate this article into your language!