The community is working on translating this tutorial into Polish, but it seems that no one has started the translation process for this article yet. If you can help us, then please click "More info".
Tworzenie modelu
In the last two articles, we started out by creating a Controller and then a View. We combined the two, to create a simple, HTML based web page. However, at this point, our View might as well have been a flat HTML file, because it didn't do anything other than output basic HTML. The idea behind MVC (Model-View-Controller) is of course to mix HTML with data generated by the server and this where the Model comes into play.
In the MVC architecture, the Model is generated by the Controller and then passed to the View, which outputs the relevant data to the user. As you saw in the previous article, we can do without the Model if we don't have any server-generated data for the specific page, but as soon as we do, we'll use a Model.
But what does a Model look like? Well that's actually up to you, because a Model can be any kind of object found in the framework. It could in fact be a simple number or string, or it could be a complex object instantiated from a class, e.g. a User class which holds information about a user, a GuestbookEntry item which contains a post to a guestbook or anything else. That also means that your Model can be a class you already have, e.g. something that comes from the database, or a class that you create specifically to become a Model for one or several Views.
Adding a Model
Let's add a Model to our HelloMVCWorld project (created in the previous article on controllers). For the sake of this example, we will be creating a new Model instead of relying something already defined in the project.
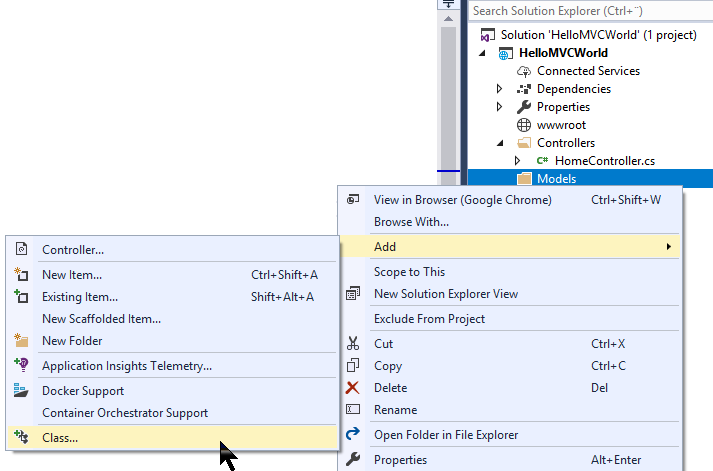
Just like we usually keep controllers in a folder called "Controllers" and Views in a folder called "Views", we will add a folder called "Models" to the root of our project. So, right-click the project name in the Solution Explorer and select Add -> New Folder, just like we did in the previous articles. When you have added the "Models" folder, it's time to create the actual Model. As mentioned, models are just regular classes, so that's what we'll be adding:

Since we will use this class to contain basic information about a Movie, in the dialog that pops up simply enter Movie.cs as the name of the new class. Visual Studio will create a new, empty class for you, which should look like this:
using System;
using System.Collections.Generic;
using System.Linq;
using System.Threading.Tasks;

namespace HelloMVCWorld.Models
{
    public class Movie
    {
    }
}
Let's add some basic properties to it - the class should now look like this:
public class Movie
{
    public string Title { get; set; }
    public DateTime ReleaseDate { get; set; }
}
Now our Model class is ready. As we talked about, the Model should be instantiated by the Controller, so let's head over to the HomeController we created in a previous article. It previously just returned a View from the Index() method, like this:
public IActionResult Index()
{
    return View();
}
But let's change this method to return a View with a Model:
public IActionResult Index()
{
    Models.Movie movie = new Models.Movie()
    {
    Title = "The Godfather",
    ReleaseDate = new DateTime(1972, 3, 24)
    };
    return View(movie);
}
We did two changes: We instantiated a new Movie object, with one of most critically acclaimed movies in the world and then we passed this object to the View() method. This will make sure that our model is available in our View. Remember the View we created in the previous article, called Index.cshtml? Time to open it up again and have a look.
As previously mentioned, a View can work without a Model just fine, but when we want to actually use a Model, we need to make the View aware of this and tell it which type we expect the Model to be. This is done with the Razor @model directive, usually in the top of the View file, like this:
@model HelloMVCWorld.Models.MovieNow our View knows that it should expect a model of the type Movie, which gives you at least two advantages: If a wrong type of model is accidentally passed to the View, an error will be raised and also, Visual Studio will be able to help you with IntelliSense when you use the model in the view. So let's do that:
@model HelloMVCWorld.Models.Movie
@{
    Layout = null;
}

<!DOCTYPE html>

<html>
<head>
    <meta name="viewport" content="width=device-width" />
    <title>@Model.Title</title>
</head>
<body>

    The movie <b>@Model.Title</b> was released @Model.ReleaseDate.ToLongDateString()

</body>
</html>
Notice how I reference the keyword Model several times in the markup now - this gives me direct access to the model we passed into the View, in this case the instance of the Movie class. That means that I can use properties from it, e.g. the Title and the ReleaseDate properties. Time to test our work - press F5 to run the project and hopefully you should be met with the information about "The Godfather".
You may also have noticed that I prefix the Model keyword with the @ (at) character, e.g. @Model.Title. This is all part of the Razor syntax, which we'll talk much more about in an upcoming chapter.
Summary
Congratulations, you have now finally come full circle and combined a Model, a View and a Controller (MVC). I know that a lot of concepts might seem like a mystery at this point, but I felt that it was important for you to see something fully functional and live, before going into more of the theory behind. Read on to learn more about this awesome technology!