The community is working on translating this tutorial into Romanian, but it seems that no one has started the translation process for this article yet. If you can help us, then please click "More info".
Client-side Model Validation
So far, all the Model validation we have used in this tutorial has been done server-side. This means that the Model is passed back to the server where the validation is performed according to your Data Annotations and then a result is returned to the user. This is both good and bad:
It's good because you can't trust client-side validation - the user can simply bypass or change any type of validation performed on the client. In other words, you always need to validate things on the server to make absolutely sure that everything is as you expect them to be.
On the other hand, the extra round-trip to the server makes the validation a bit slower (or a lot, if there's high latency between the server and the client) and it also raises the resource requirements for your web application: If a LOT of users are accessing it at the same time, a lot of extra validation calls to the server will be made.
So, to get the best from both worlds, you should first perform validation on the client - if any errors are found, you don't have to perform the server-side validation. Instead, you just immediately tell the user what's wrong so they can fix it. On the other hand, if no errors are found by the client-side validation, you make the call to the server and perform the validation there as well, to make absolutely sure that everything is in order.
Previously, this double-validation approach would require you to write validation code in both C# (or whichever server-side language you used) for the server and in JavaScript for the client. This was very cumbersome and could easily lead to inconsistencies. Fortunately for us, ASP.NET Core tries to solve this problem for us: When you use Data Annotations for your Models, as described in previous articles, and you use Tag Helpers or HTML Helpers to generate your forms with, the framework will automatically generate validation data for the elements. This data can be used by a JavaScript library for client-side validation, created by Microsoft on top of an existing JavaScript validation library for jQuery.
This might sound complicated, but that's because good and robust validation IS a complicated task. Therefore I'm going to do a complete walk-though of how you can achieve both server-side and client-side validation in your ASP.NET MVC application using the same Model.
The Model
In our example, we'll create a FORM for creating a new user profile for our imaginary website. The first thing we'll define is our model, called WebUser, which is very simple. It uses Data Annotations for all relevant properties to indicate how the Model should be validated. It looks like this:
using System.ComponentModel.DataAnnotations;

namespace ClientSideValidation.Models
{
    public class WebUser
    {
    [Required]
    [StringLength(25)]
    public string FirstName { get; set; }

    [Required]
    [StringLength(50, MinimumLength = 3)]
    public string LastName { get; set; }

    [Required]
    [EmailAddress]
    public string MailAddress { get; set; }
    }
}
The Controller
We have a Controller called UsersController - so far, it only has two methods and they are both called Create(). There's one for the GET version, which will simply serve the View, and then there's the POST version, which is called when the FORM is submitted to create the new user. It will check if the Model is valid (which is done automatically, thanks to the Data Annotations) and then return the View. Here's how it looks:
using ClientSideValidation.Models;
using Microsoft.AspNetCore.Mvc;

namespace ClientSideValidation.Controllers
{
    public class UsersController : Controller
    {
    [HttpGet]
    public IActionResult Create()
    {
        return View();
    }

    [HttpPost]
    public IActionResult Create(WebUser webUser)
    {
        if(ModelState.IsValid)
        {
        // Here the WebUser should be saved. Afterwards we would normally return another View, to
        // indicate that the User has been successfully created, or redirect to another page
        }
        return View();
    }
    }
}
The most interesting part is the check of the ModelState.IsValid property. This is automatically filled by the framework after the Model has been validated according to your Data Annotations.
The View
The View is a pretty basic FORM to support the properties of the WebUser class. We'll use Tag Helpers (they are described in detail elsewhere in this tutorial) to generate labels, input fields and validation output - notice how little markup we need to accomplish all of this:
@model ClientSideValidation.Models.WebUser
@{
    ViewData["Title"] = "Create";
}

<h1>Create user</h1>

<form method="post" asp-controller="Users" asp-action="Create">
    <div>
    <label asp-for="FirstName"></label><br />
    <input asp-for="FirstName" />
    <span asp-validation-for="FirstName" style="color: red;"></span>
    </div>
    <br />
    <div>
    <label asp-for="LastName"></label><br />
    <input asp-for="LastName" />
    <span asp-validation-for="LastName" style="color: red;"></span>
    </div>
    <br />
    <div>
    <label asp-for="MailAddress"></label><br />
    <input asp-for="MailAddress" />
    <span asp-validation-for="MailAddress" style="color: red;"></span>
    </div>
    <br />
    <input type="submit" value="Create" />
</form>
Please be aware that, as of writing this, Tag Helpers still needs to be manually enabled before you can use them. Check out our article Using Tag Helpers for more information.
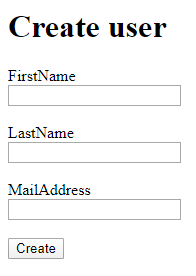
Thanks to the Tag Helpers (notice the asp-* properties) this is all turned into a complete, although basic, FORM. It should look like this:

If you check out the resulting HTML source, you'll see how much extra work the framework does for us:
<form method="post" action="/Users/Create">
    <div>
    <label for="FirstName">FirstName</label><br />
    <input type="text" data-val="true" data-val-length="The field FirstName must be a string with a maximum length of 25." data-val-length-max="25" data-val-required="The FirstName field is required." id="FirstName" maxlength="25" name="FirstName" value="" /><br />
    <span style="color: red;" class="field-validation-valid" data-valmsg-for="FirstName" data-valmsg-replace="true"></span>
    </div>
    <br />
    <div>
    <label for="LastName">LastName</label><br />
    <input type="text" data-val="true" data-val-length="The field LastName must be a string with a minimum length of 3 and a maximum length of 50." data-val-length-max="50" data-val-length-min="3" data-val-required="The LastName field is required." id="LastName" maxlength="50" name="LastName" value="" /><br />
    <span style="color: red;" class="field-validation-valid" data-valmsg-for="LastName" data-valmsg-replace="true"></span>
    </div>
    <br />
    <div>
    <label for="MailAddress">MailAddress</label><br />
    <input type="email" data-val="true" data-val-email="The MailAddress field is not a valid e-mail address." data-val-required="The MailAddress field is required." id="MailAddress" name="MailAddress" value="" /><br />
    <span style="color: red;" class="field-validation-valid" data-valmsg-for="MailAddress" data-valmsg-replace="true"></span>
    </div>
    <br />
    <input type="submit" value="Create" />
    <input name="__RequestVerificationToken" type="hidden" value="CfDJ8C-7mCG55hBDrFHYMGeG3xGBvY_epwiSr_q_mFnFRpTKHxdV8s0kZB-v0LZtzzOrKOpTHvxPvb_4oukqQCBdOj3idVTMAiic9h-oZahWfai5LK6MOVbEpsiqyzyKAD89JX8O7YfiXSegLbcDZpHcQQI" />
</form>
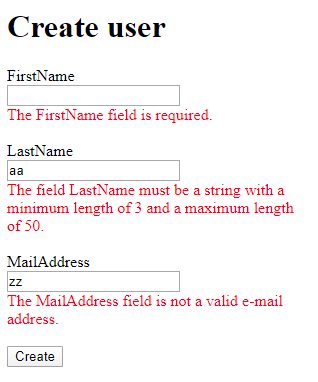
When you click on the Create button, the FORM is POST'ed to the Create(WebUser) method on the UsersController. It will be serverside-validated and then the View will be returned, but with visible validation output - all of this happens without any extra effort, which is really cool:

However, at this point, we're still only using serverside-validation - let's change that.
Adding Client-side validation
Now comes the cool part! Because we have been meticulous in creating our Model and our View the correct way, all we need to do to add client-side validation is to include a couple of JavaScript libraries - the rest will be handled automatically because we have created our Model with Data Annotations and our FORM with Tag Helpers. Simply include the following lines in your View our your Layout file, preferably inside the HEAD section:
<script src="https://cdnjs.cloudflare.com/ajax/libs/jquery/3.4.1/jquery.min.js"></script>
<script src="https://cdnjs.cloudflare.com/ajax/libs/jquery-validate/1.19.1/jquery.validate.min.js"></script>
<script src="https://cdnjs.cloudflare.com/ajax/libs/jquery-validation-unobtrusive/3.2.11/jquery.validate.unobtrusive.min.js"></script>
When you reload the page, you will notice something cool: Validation is performed automatically as soon as you start filling out the FORM and if you click on the Create button, the FORM is only submitted to the server if the FORM appears to be valid. If it is, and then FORM is sent back to the server, it will be server-side validated according to the same rules which you have only specified in one place. This is really the beauty of tying together the various components of the ASP.NET Core framework!
Please notice
- The first line is just the regular jQuery framework - if you already include this elsewhere, you don't need to include this line
- All references here are for a specific CDN (Content Delivery Network) - you can choose another CDN or download the files and serve them directly from your website
- All references here are for specific versions (jQuery version 3.4.1 and so on) - you may want to check if newer versions are available
Summary
Validating user input has always been a pain - it requires a lot of effort and repetitive code, especially if you want both client-side and server-side validation. However, as shown in this article, the ASP.NET Core framework makes this task a whole lot easier, faster and more robust!